Tools.Valarm.net + AirBeam Air Quality Sensors
Does your organization need to monitor air quality? Above you’ll see a video that goes over the steps to connect your AirBeam air quality sensors to Tools.Valarm.net.
Also have a look at this write-up with pictures and links on how to hook up your AirBeams.
If you’ve got any questions about Industrial IoT and remote monitoring, then please don’t hesitate to Contact Us at Info@Valarm.net.
Video Voiceover / Transcript:
Howdy! This is Edward from Valarm.
Air pollution is a huge problem all around our world. Bad and dirty air quality can impact your health, causing asthma or even cancer and heart disease. How can your organization effectively monitor air quality?
 You’ll learn in this video how to connect AirBeam air quality sensors to Tools.Valarm.net a.k.a. Valarm Tools Cloud. The AirBeam air quality sensor monitors your pollution exposures in real-time. It’s the black box you see in the photos that kinda looks like it has Mickey Mouse ears.
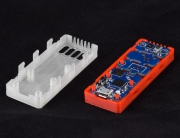
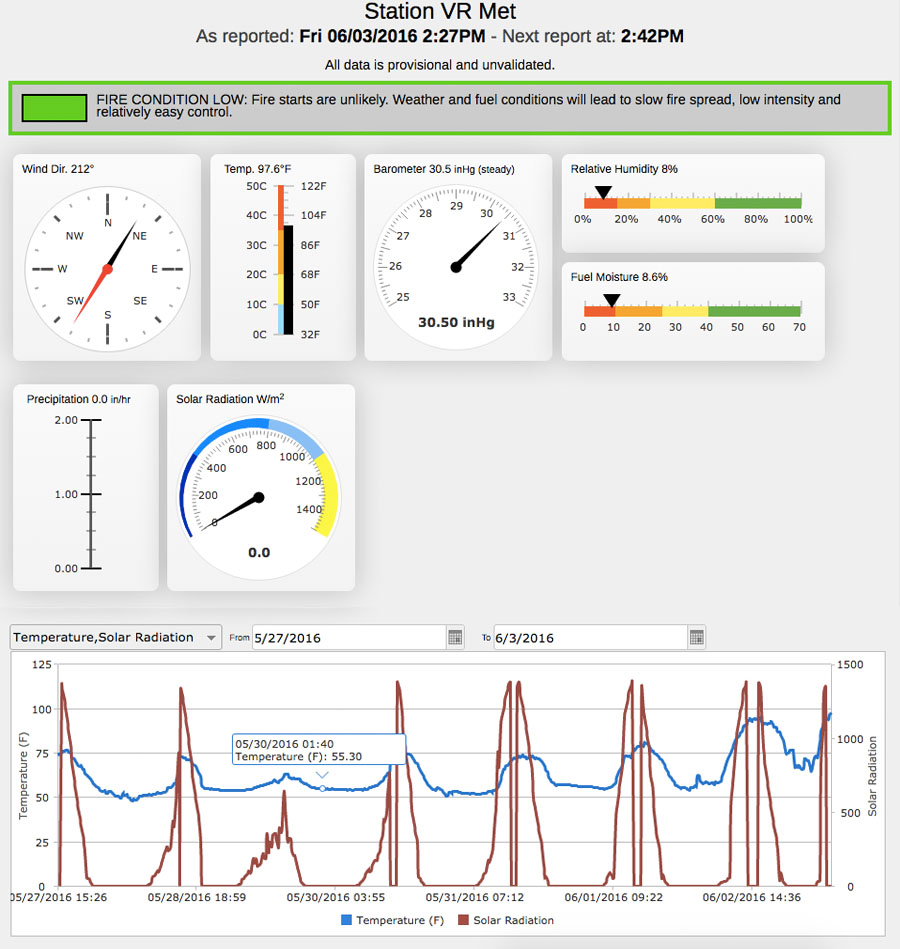
For each of your AirBeam air monitors, you’ll need a sensor hub and serial sensor adapter from Shop.Valarm.net. Your sensor hub connects to Tools.Valarm.net via WiFi, ethernet, or GSM mobile cell network. You can also include a GPS sensor from Shop.Valarm.net if you’d like all of your air quality information to be geo-tagged so you can view it on 2D and 3D maps like you’re seeing in screenshots here from Tools.Valarm.net.
 A heads up reminder for you to note that all of these steps are detailed thoroughly on our blog so if something doesn’t make sense here then have a look at our Blog Post Write-Up on using Tools.Valarm.net with AirBeam air quality sensors. And please don’t ever hesitate to contact us at Info@Valarm.net and we’ll help make sure your air quality monitoring needs are met.
You’ll also see other air quality sensors in the images here like the Alphasense OPC-N2 Optical Particle Counter. Since Tools.Valarm.net is an open platform your organization can connect Industrial IoT sensors made by just about any manufacturer around the world. Let’s get into more details on how to automatically and remotely monitor your AirBeam sensors.
First off download Arduino from www.arduino.cc for your operating system. You’ll see we’re using the Apple Mac OS X version in this HowTo Tutorial.
For the second step you’ll download the DHT Sensor Library from the Dropbox link you see here or go to our Blog article to get the direct link.
Now we’ll set up some configurations in your Arduino software so we can upload a new code base to your TakingSpace / HabitatMap AirBeams so they’ll output air quality sensor measurements in a format ready for Tools.Valarm.net . Under Sketch, Include Library, click Add .ZIP library and select the DHT Sensor Library ZIP file you just downloaded in the previous step.
 Under Tools -> Board make sure you’ve got Arduino Leonardo selected since that’s what’s running inside your AirBeam air quality sensors.
Next under Tools -> Port select your USB port where you’ve got your AirBeam sensor plugged into your computer. This tells the Arduino software where to deploy the Arduino code we’ll be updating on the AirBeams.
Using File -> Open open the Arduino code that is available at the URL you see here below. The code will look something like what you’re seeing here with a note at the top of how this is custom code for AirBeam air quality sensors to connect to Tools.Valarm.net .
You’re now ready to upload your new Arduino source code that’s compatible with Tools.Valarm.net . Upload your code by clicking the arrow that’s pointed at with a big, bright red arrow in this screenshot. After you click this arrow that’s pointing right then Arduino will tell you it’s uploading your code and then when it says it’s done then you’re all done reprogramming your AirBeam to be compatible with Tools.Valarm.net.
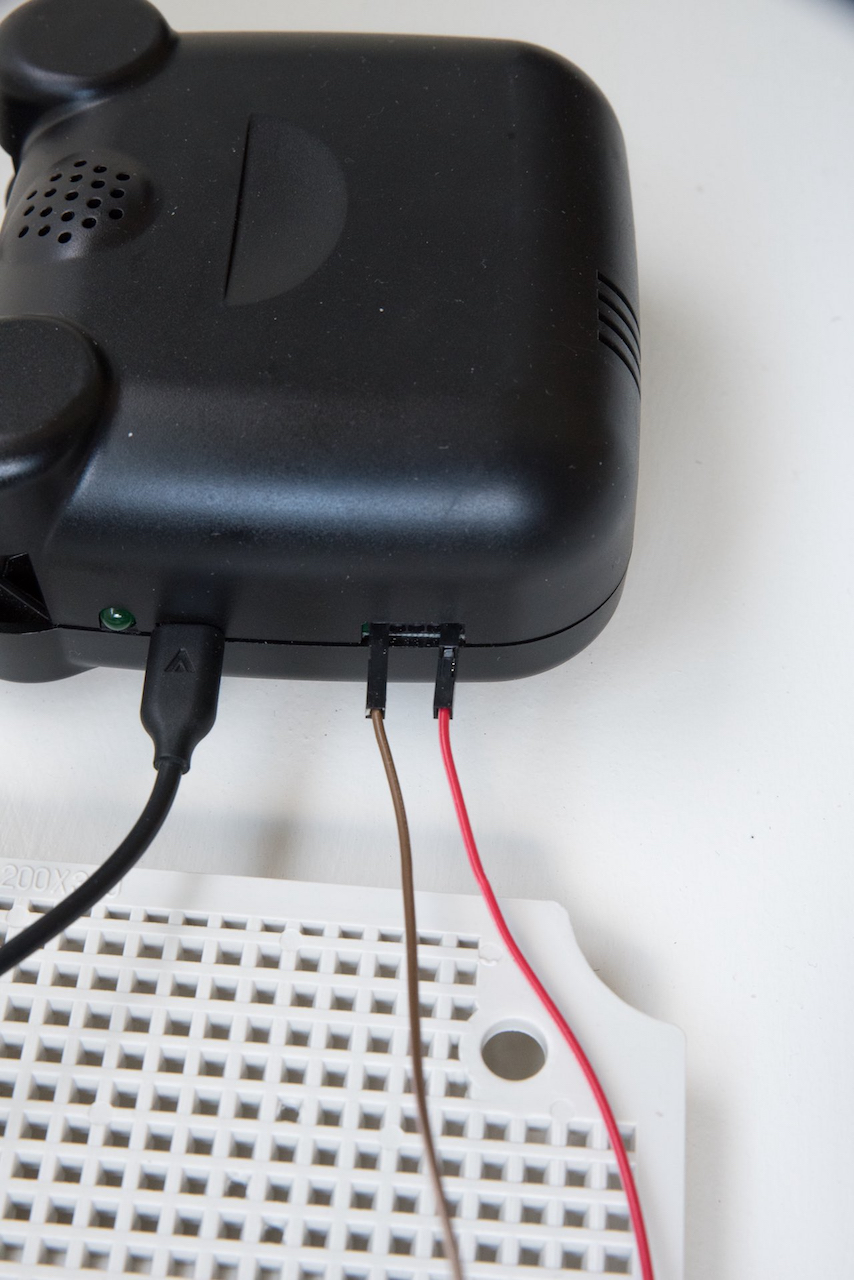
 Double check and make sure you’ve got your cables and wires set up just right. You’ll need 2 wires, like the red and brown ones you see in the photo to connect to the pins closest and farthest from the micro USB port.
Now make sure these wires correspond and connect to the RD (Receive Data) and GND (ground) connectors on your Yoctopuce serial sensor adapter. The Red wire goes to RD on the serial sensor adapter and receives air quality sensor data from the AirBeam. The other end of the red wire is connected to the pin farthest away from the USB port on your AirBeam. The Brown wire goes to GND or ground on your serial sensor adapter and connects to the pin socket closest to the USB port on your AirBeam. Use any color of wires you want just make sure they’re all hooked up as specified here and in the blog story write-up.
 If you haven’t already connected your sensor hubs from to Tools.Valarm.net then be sure to follow the 4 minute step by step video tutorial on How To Use Valarm Tools Cloud. Next up we’ll configure the serial sensor adapters that are connected to your sensor hubs from Shop.Valarm.net .
You’ll have the virtualhub software installed on your computer from configuring and linking your sensor hubs to Tools.Valarm.net . Plug your serial sensor adapter into your computer for initial configuration and click the serial name of your serial sensor adapter, like YSERIAL1-49680 you see in this example. After you click the serial name you’ll see the Conversation window. If you don’t see anything make sure to set your output mode to Line-Based and set your baud rate to 115200 or whatever is specified in your custom Arduino code you just uploaded.
This screenshot is just 1 example of custom code where we’ve edited the code to put out just the sensor variables we want like temperature in fahrenheit, relative humidity percentage, analog total, and hppcf and ugm3 air quality sensor measurements. You can change the order and which of these are output by editing the Arduino .ino file we saw earlier. You can continue the configuration once you’re seeing the air quality sensor output data in comma separated value style like you see in the screenshot.
Under your serial sensor adapter configuration screen you’ll make a new job and a new task that looks something like the screenshot you’re seeing here. You’ll Receive a CSV record and then you can select which values you want to upload and what variable you want to store them in. In this example we’re taking the first 5 sensor measurements reported between the commas and storing them in genericSensor 1-5. If you only need 3 values then select those, or if you need more like 6 or 7 then use the checkboxes to configure exactly what AirBeam data you want to upload. Perhaps you have another temperature sensor and you want to use that so you can choose not to upload that field here. The order is based on the conversation that you saw previously in the Conversation window.
Now your Serial sensor is ready to be plugged into your sensor hub! Under Configure Hardware and Configure Yocto Hub you’ll see the screen here on Tools.Valarm.net. You’ll map sensor columns for each of the genericSensor fields you just set up. Here we’ve added genericSensor1 through 5 and mapped them to the User 1 through 5 columns.
We used the custom field renaming and column aliasing feature on Tools.Valarm.net to rename the columns to TmpF, RH, hppcf, and ugm3 like you’re seeing in this screenshot. See our blog on custom sensor naming and aliasing for details on how to rename your Industrial IoT sensor columns or fields.
Now your AirBeam air quality sensor information is available all throughout Tools.Valarm.net. If you’ve got a GPS sensor attached then all of your mobile air quality information will be geo-tagged and visible on 2D and 3D maps.
That’s the overview of how to connect your AirBeam air quality sensors to Tools.Valarm.net . Be sure to have a look at the blog story article on www.Valarm.net that covers these steps in detail with links to more info.
Do you have any questions? Please don’t hesitate to contact us at Info@Valarm.net if you’ve got any questions.
Want to use Alphasense, Dylos, Yoctopuce, or other air quality sensors from any manufacturer? Have a look at our Pollution + Air Quality Monitoring Overview Page.
 You can also monitor any additional air quality factors like specific gases such as VOCs, Ozone / O3, NOx / Nitrogen Oxides, or any other air quality sensor. Visit www.Valarm.net and have a look at our blog, customer stories, and Industrial IoT dashboards for remotely monitoring anything, anywhere.
From:
- Water wells, flow meters, water resources management,
- Chemical distribution,
- To fleets of vehicles, trucks, and trailers loaded up with industrial equipment like pumps, vacuums, and tanks.
We’re happy to help you make sure that your air quality and all of your monitoring needs are satisfied with Tools.Valarm.net software.
Thank you for watching.
And remember, please don’t hesitate to contact us at Info@Valarm.net if you’ve got any questions.