Would you like an easy, rapidly deployable, rugged, and cost-effective way to remotely monitor piezometers / vibrating wires?
This step by step tutorial shows you how quickly you can get your piezometer / vibrating wire (VW) sensor data to Tools.Valarm.net where you and your teams can easily map it, graph it, analyze it, or forward it to your systems via Valarm’s open APIs like JSON.
Who uses piezometers, transducers, and vibrating wires with Tools.Valarm.net?
Take a gander at this Industrial IoT Customer Story with use cases and case studies of remotely monitoring Geokon piezometers and evaluating expansion joints on bridges.
See this remote monitoring deployment where we teamed up with the government of California Department of Water Resources and other organizations to monitor water and levees with piezometers / vibrating wires.
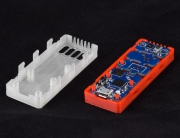
In this example we’ll be using Tools.Valarm.net with the following Industrial IoT / IIoT hardware:
- Valarm compatible WiFi sensor hub
- RS-232 sensor adapter
- Geokon LC-2 data logger
- Geokon piezometer 4500S VW
You see a solar powered Valarm box in the photo on the right. The weatherproof box contains the hardware mentioned above minus the actual piezometer / vibrating wire probe that comes out of the box for deployment in the field.
 The Geokon 4500S piezometer / vibrating wire is in the photo on the left. The blue piezometer cable goes into the Valarm box through a weatherproof cable gland / strain relief cord connector. Then the blue vibrating wire cable connects to the right side of the Geokon LC-2 data logger in the upper left part of the box.
Coming out of the left side of the Geokon LC-2 data logger is a white serial RS-232 cable that connects to a Valarm compatible RS-232 sensor adapter.
Each RS-232 sensor adapter connects via a micro USB cable into WiFi sensor hubs (or GSM cell network sensor hubs) that send your sensor data from your Geokon piezometers / vibrating wire sensors to Valarm Tools Cloud in real-time.
This is all that you’ll need for a super cost-effective way to remotely monitor your piezometers / vibrating wires with a Valarm connector device that has access to the internet and Tools.Valarm.net. Below are step by step instructions on getting data from your Geokon piezometers to Valarm Tools Cloud!
UPDATE: See this tutorial for another way to upload sensor data from your Geokon piezometers / vibrating wires using the CSV Input Parser on Valarm Tools Cloud.
NOTE: You can upload more / ALL of the sensor fields / parameter measurements if you use this Inbound CSV Parser on Tools.Valarm.net.
Valarm Tools Cloud – Piezometer Vibrating Wire Setup and Configuration
1-time initial setup and configuration is quick and easy with Valarm remote monitoring solutions as you’ll see in the guided HowTo instructions below. After that just power up your Valarm system and it’ll automagically upload your piezometer information to the cloud. You’ll be able to see your geo-enabled data on maps, graphs, download it, access it via APIs, and see it in the Valarm Tools Cloud Device Manager like the screenshot below.

Valarm Tools Cloud screenshot with real-time remote monitoring information from a Geokon Piezometer / Vibrating Wire 4500S and Geokon LC-2 data logger
After you have all of the required hardware you’ll need to connect it all as seen in the photo above. Don’t forget the batteries in the Geokon LC-2 data logger! Connect the wires inside the data logger as specified in the Geokon documentation. Then connect the serial cable to your Valarm compatible RS-232 sensor adapter. The RS-232 sensor adapter connects to your Valarm Tools Cloud connector device with a micro USB cable.
To set up remote monitoring with Valarm you’ll need to download and run Virtualhub from Yoctopuce. Once you’ve got Virtualhub running, go to http://localhost:4444 in your favorite web browser to pull up Virtualhub config. Plug in your sensor hub (WiFi, ethernet or other) to your computer via USB. Also plug your RS-232 sensor adapter into 1 of the sensor ports on your sensor hub. You’ll see something like the screenshot below in your web browser – we used Chrome for these screenshots.

Click configure on your sensor hub, in this case a YoctoHub-Wireless-g. You’ll see the YoctoHub wireless configuration settings below where it’s already been configured to report sensor data to Valarm Tools Cloud. See this tutorial and video for instructions on how to connect your Valarm devices to Valarm Tools Cloud. This write-up’s focus is on Geokon piezometer configuration after you’ve got your Valarm devices connected to Valarm Tools Cloud.

Once you click configure on your connector device make sure it’s WWW ready / connected to the web. Also make sure you’re on the same network as your device for this 1-time initial configuration. Note the outgoing callback is configured for reporting to Tools.Valarm.net. If you haven’t already done this then follow this tutorial and video for how to connect your sensor hub to the cloud. Next connect to your sensor hub directly in your web browser by copying and pasting its current IP address into your browser then hitting enter.

Now we’re remotely connected to the sensor hub (192.168.1.23 on our local router) and can see the sensor hub’s currently connected sensors. In this case there’s a Yocto-RS232 connected, which we’ll click “configure” so we can set up communication with the Geokon piezometer / vibrating wire and Geokon LC-2 data logger.

Under the RS-232 configuration make sure you’re using 9600 baud rate with 8N1 encoding, a.k.a 8 data bits, no parity bit, and 1 stop bit. Also make sure there’s no flow control when you want to work with Geokon piezometers. Next click the manage job files button to set up the communication between the RS-232 sensor adapter and the piezometer.

Define a new job if you don’t already have one and we’ll edit it as seen in the next screenshot below.

We’ll add a task and edit it to set it up like the configuration below.

For configuring this Valarm device to talk to Geokon piezometers and data loggers you’ll want to create a periodic task that sends data at a predefined interval. We’ll use a custom protocol and define each of the 5 steps / commands you see in the screenshot above. You can set the time interval between sensor data readings in the 4th step, in this case we’re getting the latest Geokon piezometer data every 5 seconds. Let’s talk more details on each of the 5 steps / actions / commands for our custom piezometer / vibrating wire protocol.
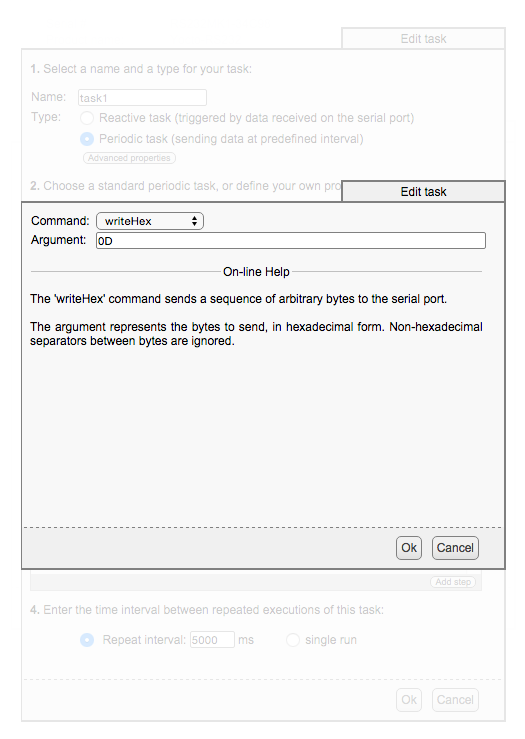
Due to the ASCII data format of the piezometer data logger we’ll need to send some commands, like enter or carriage return, in hexadecimal format. This first command writeHex 0D sends a wake up call to the data logger so it’s alert and ready to get to work!

Let’s give the Geokon piezometer data logger a moment to wake up, have a coffee, and get rid of any drowsiness before we tell it more commands to do. In this command we wait 500 milliseconds before sending the next command.

Now that the Geokon LC-2 data logger is awake, we’re ready for a piezometer sensor reading so we’ll write the appropriate command for a vibrating wire data reading – X.

To send our request for a piezometer sensor data reading we’ll write Hex 0D a.k.a. carriage return / CR. Get ready for piezometer data!
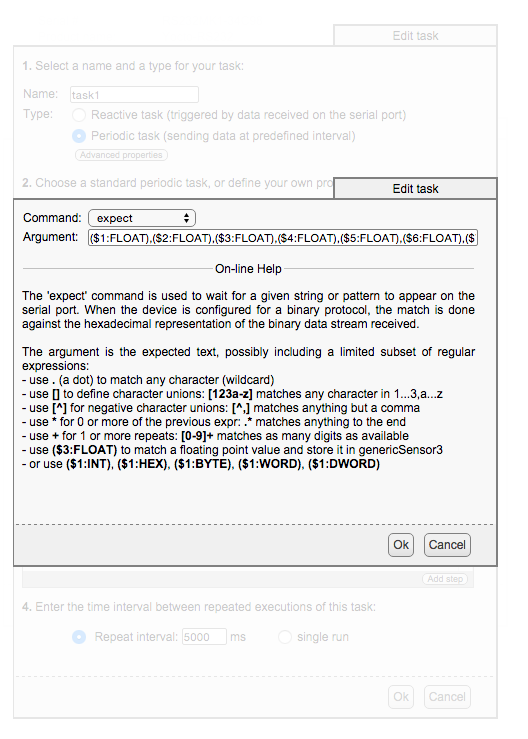
In this last task we receive the piezometer sensor reading and store each of its 8 data values into a genericSensor variable that’s sent to Tools.Valarm.net. Use the expect command and 8 float arguments separated by commas to receive the Geokon piezometer data and store each piece of the sensor reading in generic sensor variables.

That’s it! Save everything and set the Startup job of your RS-232 sensor adapter to default.job or the name of the job file you created in the steps above.
Now your piezometer sensor data is being sent to Tools.Valarm.net. If you haven’t already set that up then follow this video tutorial for connecting your sensor hub to Tools.Valarm.net.
Mapping the piezometer sensors is the same as how it’s shown in the initial configuration video tutorial. In Valarm Tools Cloud, click your device name under Device Manager and then Configure Yocto Hub to get the screen below.

Click add >> on each of the RS-232 generic sensor readings and map them to your user channels 1 – 8. These correspond to each of the 8 readings that the Geokon piezometer reports as often as you’ve configured! Once you’ve mapped the piezometer sensor channels you’ll see them all around Valarm Tools Cloud on maps, graphs, APIs, and sensor data tables like below.

That’s it for this write-up and step-by-step tutorial on how to cost-effectively get your remote Geokon piezometer / vibrating wire sensor data to Valarm Tools Cloud.
Lessons learned:
- The distinct, subtle differences between carriage returns, line feeds, enter keys, return keys, and all that fun which goes along with Hex and ASCII character codes – necessary for cloud-enabling old school yet very powerful sensors like piezometers / vibrating wires
- We’d worked previously with pressure transducers and other level monitoring sensors for Valarm customers in oil & gas, agriculture, and government – our first experiences with piezometers were really fun!
- At recent conferences we’ve been asked about a more cost-effective way to remotely monitor piezometers. Easily monitoring a new industry standard sensor, used by mining and other industries, is further proof that Valarm really can monitor anything, anywhere!
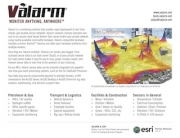
See our Industrial IoT / IIoT Customer Stories Page for more details on how our customers use remote monitoring systems to monitor things like:
- Flood Warning Systems and Water Level Sensors for Emergency Preparedness and Monitoring Natural Disasters in Smart Cities
- Water Resources Management, Water Wells, Flow Meters, Groundwater Aquifer Health, and Monitoring Fluids
- Government Organizations and Agencies
- Tank levels and product volumes for effective chemical distribution and supplier managed inventory (SMI)
- Levees and Water
- Bridges and Structural Health
 Questions?
We’re ready to help you, your teams, and your organization deploy your most effective remote monitoring systems.
Please don’t hesitate to contact us at Info@Valarm.net if you’ve got any questions.