Would you like to configure your Industrial IoT sensor hubs to upload sensor measurements to Tools.Valarm.net at specific, exact moments in time, while going into a battery-saving, deep sleep between readings?
That’s what you’ll be learning about in this here story.
When would you use this?

1 example is for our customers with flood warning systems monitoring water levels, a common scenario is to measure water levels with a sensor reading every 6 minutes on the dot. This means regular flood monitoring system measurements at exactly 8:00, 8:06, 8:12, … 8:54, 9:00, 9:06, etc. throughout the day, every day.
Remote monitoring systems are often connected to sensor that need to warm up after they wake up, in order to take a proper measurement. We’ll cover that in this write-up too, configuring your sensor hubs to wait for 60 seconds after they wake up. This initial upload delay after giving the sensors power lets the sensors warm up, grab a cup of coffee, and report proper sensor measurements after they’ve had a moment for their usual wake up routine. This feature is also know as the callback Initial Delay.
 You’ll also see the time snap calculator feature used in this article. Given the slight millisecond time differences in various clocks around the world, this nifty time interval snapping feature gives us the ability to time stamp IoT sensor upload events to specific times, like the nearest minute, or in this example we’ll be snapping to the nearest 6-minute time stamp, e.g., xx:00, xx:06, …, xx:48, xx:54, etc.
 Ready? Let’s get started.
1st off you’ll login in to your Tools.Valarm.net account and go to your Device Manager.
Configure your sensor hubs to upload to Tools.Valarm.net using your routing code, like in this tutorial, and make sure your Industrial IoT devices are integrated with Tools.Valarm.net and your sensors are mapped to the fields / columns you’d like.
 In your Device Manager, click on your device you’d like to configure and you’ll see your device details page. On your device details page, under Configure Hardware, Configure Yoctopuce Hub, go to the Hub Config tab like you see in the screenshot. We’ll configure the settings on your sensor hubs, so we’ll click the checkbox for Settings at hub override settings here. Save this and we’ll configure your time stamp snap calculator next.
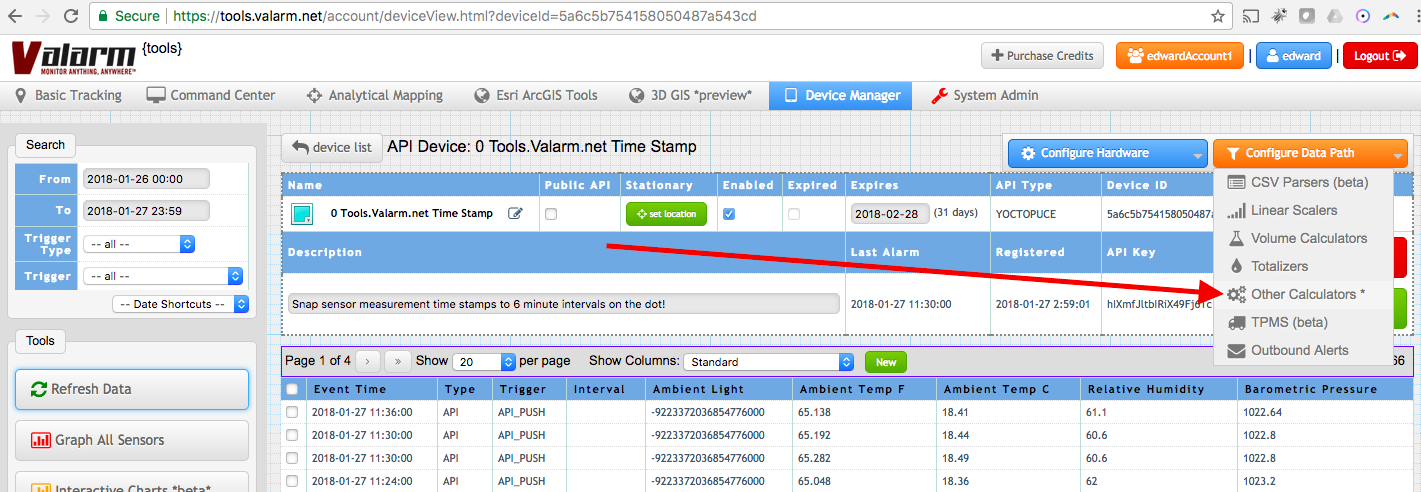
The timestamp snap calculator feature is under the orange Configure Data Path -> Other Calculators.

 In the drop down menu for Calculator Type, select the Snap event Timestamp to a set multiple.
Give your calculator a name (we called our SnapTime in this demo example) and then click the blue + button to create your new calculator.
In your Edit Calculator dialog box you can enter notes on what you’re configuring, like snapping time stamps to every 6 minute interval.
This calculator “snaps” the timestamp of the sensor upload event to a multiple of the provided variable. This will “round” or snap the timestamp of the event up or down, to the nearest multiple of the selected input (in seconds). Note that input and output channels must be selected, but are ingnored.

After you’ve written notes about what your calculator will do, select any option for the output and input channels since these will be ignored.
The key is that you enter your time snap intervals in your Calculation Variable 1. This is the value in seconds to which the timestamps should be snapped. For example, a value of 60 will force all events to fall on one-minute intervals.
In this tutorial, we’ll be snapping to 6-minute intervals, so we’ve typed in 360 (360 seconds = 6 minutes) for the Calculator Variable.
Use the checkbox at the top to make sure your calculator is enabled. Then save your calculator by clicking the green save button. Next we’ll use virtualhub to configure your sensor hub to sleep, wake, and delay initial sensor measurements uploads.

 Connect your sensor hub to your computer with a USB cable and fire up virtualhub. Launch your favorite web browser and go to http://localhost:4444 like you did in initial sensor hub configuration when you linked your sensor hub to Tools.Valarm.net.
Click the Serial name of your sensor hub you’ll be configuring. Note that these sleeping and waking features documented here will work with GSM and WiFi sensor hubs from Shop.Valarm.net. There is another way to do this with ethernet hubs, please don’t hesitate to contact us at Info@Valarm.net for more info, or if you’ve got any questions.
After you click the serial name of your sensor hub in your device list, you’ll see info about your sensor hub. Click on the Open API browser (pop-up) link under Misc.

 Now in the API browser list, find the variable callbackInitialDelay.
Before your sensor uploads sensor measurements, and after it has woken up from sleep, it will wait the amount of time (in seconds) that you set here for your callbackInitialDelay. In this example, we’re configuring flood warning systems that use Flowline level sensors. Generally, these sensors need about a minute to warm up, so we’ll click edit and set the initial delay to 60 and then click apply.


Note that other sensors, like those made by Geokon, Senix, or ClairAir, need more or less warm up time, so you can configure and experiment with this setting according to which particular sensors you’re monitoring with Tools.Valarm.net.
Important: After you’ve set your callbackInitialDelay variable, you’ll need to save it to the flash RAM on your sensor hub. Farther down in the API browser window, find the persistentSettings variable under module.
Use the drop down menu to change the persistentSettings value to Save to flash. Then click apply.

Next up let’s configure the sleeping and wake-up settings for your sensor hubs.
Go back to the virtualhub homepage, localhost:4444, and click the configure button for your sensor hub in your IoT device list.
Notice in the screenshot that our sensor hub is already linked to Tools.Valarm.net with a routing code and the callback schedule is set to upload a sensor measurements every 30 seconds.
There are 2 key pages we’ll configure under Wake-up Scheduler.
1st we’ll configure the wake-up schedule 1. Click the setup button next to wake-up schedule 1 to see the calendar.
On the wake up scheduler configuration screen you’ll see how we can define conditions and wake up times for the sensors hubs.
 In this example we’d like sensor readings on the exact 6 minute intervals, e.g., 2:00, 2:06, etc.
And we’d like to give the sensor a minute to warm up, which you did with the callback Initial Delay set up earlier.
This means we’d like the sensor hub to wake up a minute before sending a reading.
We’ll configure the sensor hub to wake up on the xx:05, …., xx:59 of every hour so that the actual sensor measurement happens exactly on the xx:06, …, xx:00 of every hour.
Using the button under the Minutes settings of the wake-up scheduler, we’ve clicked the times we want the hub to wake up, in this case 5, 11, 17, 23, 29, 35, 41, 47, 53, and 59. Save your wake up time settings and we’ll configure the last step – when to go to sleep.
Under the Configure screen for your sensor hub, above wake up schedule 1, you have the maximum power on duration setting.

Like it sounds with its name, this setting configures how long your sensor hub will stay awake each time it wakes up.
Remember that in this case we’re waiting 60 seconds before uploading a sensor reading to Tools.Valarm.net. These first 60 seconds after wake up give the sensors time to warm up, and for the sensor hub to connect to the internets.
We’ll set the wake up maximum duration to 90 seconds.
You can experiment with this setting and set it to longer or shorter times.
With shorter times awake, your battery power will be conserved, but if the time is too short for your particular network, sensor hardware, etc. combination then you may not be giving your sensor hub enough time to upload a proper reading to Tools.Valarm.net.

Notice: When you click ok to save the maximum power on duration, it’s on and the timer has started! Your sensor hub will go to sleep in the number of seconds you set, and will not wake up until the wake up scheduler time you set. Note that you can manually push the WAKE button on the sensor hub, between the antenna and the USB power, to wake the hub up and change settings if you need to.
That’s it!
We’ve gone over the nitty gritty details of how to set up a sensor hub to:
- Conserve battery life by sleeping when sensor measurements aren’t needed
- Wake up for 90 seconds every 6 minutes
- Delay 60 seconds before uploading a sensor measurement
- Snap time stamps for each sensor measurement to exact 6 minute intervals on the dot
Leave your sensor hub and test your settings in the laboratory to make sure they’re what you want. See the Tools.Valarm.net screenshot for the results we received after the steps above. You’ll see we got sensor readings as 11:24, 11:30, 11:36, 11:42, 11:48, 11:54, 12:00, etc., just what we were looking for.
You may fine-tune your settings as you see fit. Your settings will vary based on what brand of sensor hardware you’re using, your network connection, and other variables. You’ve learned in this tutorial which variables you can tweak to optimize your Industrial IoT sensor monitoring network.

This completes your overview HowTo tutorial guide on – Managing and Configuring Monitoring Systems to Upload IoT Measurements at Snapped Time Intervals with WiFi and GSM Sensor Hubs.
Questions?
 Tools.Valarm.net monitors sensors made by just about any hardware manufacturer.
Valarm Tools Cloud is a flexible software platform that gives you, your teams, and your organization rapidly and easily deployable monitoring systems.
Whether you’re monitoring flood warning systems, water wells, noise, or tanks, we’re a family company that will help you install your most effective monitoring systems.
Please don’t hesitate to get in touch with us at Info@Valarm.net if you’ve got any questions.